Pin It Now!
 ♥ Consider this tutorial my early Christmas present to you ♥
Aprons make fabulous Christmas gifts and I wanted you to have plenty of time to sew them before December. Aren't I nice? I'll even go one step further by adding this disclaimer:
I do not mind if you use this pattern for personal use, or even to sew and sell the aprons. However, please do not sell the actual pattern for profit... it is for everyone to enjoy free of charge. Materials:1 1/4 yard patterned quilting cotton
1 yard solid cotton (or fun coordinating fabric)
3/4 yard muslin
Seam Allowance: 1/2 inch
*Note: This pattern is very versatile so feel free to adjust the measurements as you see fit (shorter apron bottom, longer/shorter ties, etc).Before I begin with the steps, I want to share one big tip for "cutting" this pattern.
SNIP & RIP your fabric pieces (I see you quilters cringing!). Almost all of the pieces are rectangle. It's fast. It's easy. And it keeps your pieces on the grain of the fabric and nice and symmetrical. Don't boohoo over the loose strings and damaged raw edges of your pieces... it's nothing that a 1/2 inch seam allowance won't hide. Well worth it! Here's the quick "how to" on snipping and ripping your cotton fabric:
You're going to want to start with a nice edge that's on the grain, so snip and rip the cut ends of your fabric. Snip about an inch in then pull apart using a steady ripping motion.
When ripping your actual pieces, you'll need to make sure the ripped corners of your rectangle pieces meet up without doing too much ripping into the rest of your fabric. Do this by measuring and sniping the width and length of your fabric piece. Then do a
gradual ripping from each side until they meet at the corner
(shown below). Step One: Snip and rip (or cut if you tediously wish) your pieces
- ruffled hem: 4"x44" rectangle (solid cotton)
- apron bottom: 25"x17" rectangle (patterned cotton)
- apron lining: 25"x17" rectangle (muslin)
- waistband front: 24"x4 1/2" rectangle (solid cotton)
- waistband back: 24"x4 1/2" rectangle (muslin)
- apron ties: two 38"x4 1/2" rectangles (patterned cotton)
- neck strap: 22"x4 1/2" (patterned cotton)
- top trim of the bib: 18"x5" rectangle (solid cotton)
- bottom of the bib: 18"x6" rectangle (patterned cotton)
- muslin bib back: sized to front bib piece after it is sewn and cut
- pocket
(optional): You can do any pocket you like (plain, pleated, or gathered)... I usually just cut out a random pocket on the fold.Step Two: Prep the bib piecesOk, I said
almost all your pieces are rectangle... the bib is the exception because although you rip it as a rectangle, you'll need to trim it to a trapezoid.
So, sew the solid and patterned front bib pieces together along the long edges. Press and top stitch along the solid side.


Now you're going to cut/angle the bib so it's smaller up top (trapezoid). To do this fold this piece in half and measure 3 inches in along the solid side. From this point, your going to cut diagonally to the corner of the bottom patterned piece, so when you open it up, you have a symmetrical bib that is 12 inches on top and 18 inches on bottom.

Use this piece as a guide to cut your muslin backing:

Now you have all your apron pieces prepped. Here's what all your pieces should look like:
 Step Three: Make the bottom ruffle
I like to start with the bottom half of the apron. To make the ruffle, fold your 4"x44" ruffle piece longways right sides together and stitch both short ends. Turn, crisp corners and press in half. Use a baste stitch to gather along raw opening. Adjust the gather to 24".

 Step Four: Make the apron bottom
Sandwich the muslin and pattern rectangles ride sides together, with the ruffle in the middle facing in so the raw edges of all three pieces are lined up along the bottom (pin layers well). You'll want the ruffle ends
1/2 inch inside the 25" width of the
apron bottom on both sides. Sew along the bottom of the
apron.
*Note: You may want to break this step down by first pinning and sewing the ruffle to the apron front only, THEN going back and sewing the muslin lining on top of that:
Or if you're comfortable with sewing through that many sandwiched layers all at once, it'll look this this:
 *Optional: At this point, you may want to sew on the pocket on the patterned side.
Next, tuck or pin away the corners of the ruffle, then sew down the two 17" sides of the
apron. Turn right side out and press. Top stitch if desired.
Tuck away that ruffle corner. Notice the 1/2 inch allotted for your side seam allowance :

Sew around bottom and sides:

Turned right side out:

Top stitch along bottom:

Use a baste stitch to gather the top opening as desired (or you can add a couple of fun pleats instead).

Now that your
apron bottom is finished, you can work on the apron top (bib and neck strap).
Step Five: Sew the neck strapFor the neck strap, fold in half longways right sides together and sew along two edges. Turn right side out, press and top stitch strap. Set aside.
 Step Six: Sew the bib.
Pin the neck strap on one side of the bib top as shown (keep it 1/2 inch away from side to account for your seam allowance). I angle it in so it is consistent with the trapezoid angle when turned right side out.

Sandwich the bib pieces right sides together (with the neck strap pinned in between). Sew around three sides, leaving bottom of bib open.

Turn right side out, crisp corners and press. Top stitch along the three sides.

Now that the bib and bottom are finished, next you're going to bring it all together at the waistband.
Step Seven: Sew the Waist TiesFor the ties, fold, press and top stitch three edges of the tie rectangles (tiny... about 1/4 inch double fold).
 Step Eight: Attach waistband to apron bottom
Center the waistband on the top gathered side of the
apron bottom (you'll have about 2 to 4 inches of extended waistband on each side of the
apron bottom). Sandwich/pin the waistband muslin,
apron bottom, and waistband solid (in that order) right sides together. Stitch waistband solid and muslin to
apron bottom across the entire length of the waistband.
 Step Nine: Attach the ties
Sandwich each tie inside the ends of the waistband solid and muslin pieces (so that the right sides of the ties and waistband solid are right sides together... the tie tails will be facing inside the
apron while you do this). Sew both ends of the waistband to secure the ties on. Turn and press.
 Step Ten: Attach the bib
Flip your
apron to the muslin side. Center the bib with the waistband. Pin right sides together (muslin bib to muslin waistband) and stitch along bottom of bib
(you'll only be stitching through the bib layers and muslin waistband...
NOT the solid waistband piece).


Now turn
apron to right side and press the top of the solid waistband in on itself, so the top edge of the waistband pieces match up (pin well, making sure that your pressed edge covers your stitching from the bottom half of the bib.) Top stitch along length of the top waistband through all layers.

Top stitched waistband:

For the neck strap fasteners, I use an industrial snap press, but you can do a button and buttonhole to attach it to the bib. I like to make the neck strap adjustable, so I space out three snaps.
I do love my snap press and justified buying it because I make cloth diapers for my babies and also use the press for my baby bibs and other projects. It's super fun :) Here's where I got mine if that's something you think you'll want to invest in someday:
I bought mine from
here years ago and use the industrial size 20 dies and polyresin snaps, and my friend got hers from
here and uses the standard size 20 dies and polyresin snaps.
♥♥♥♥♥


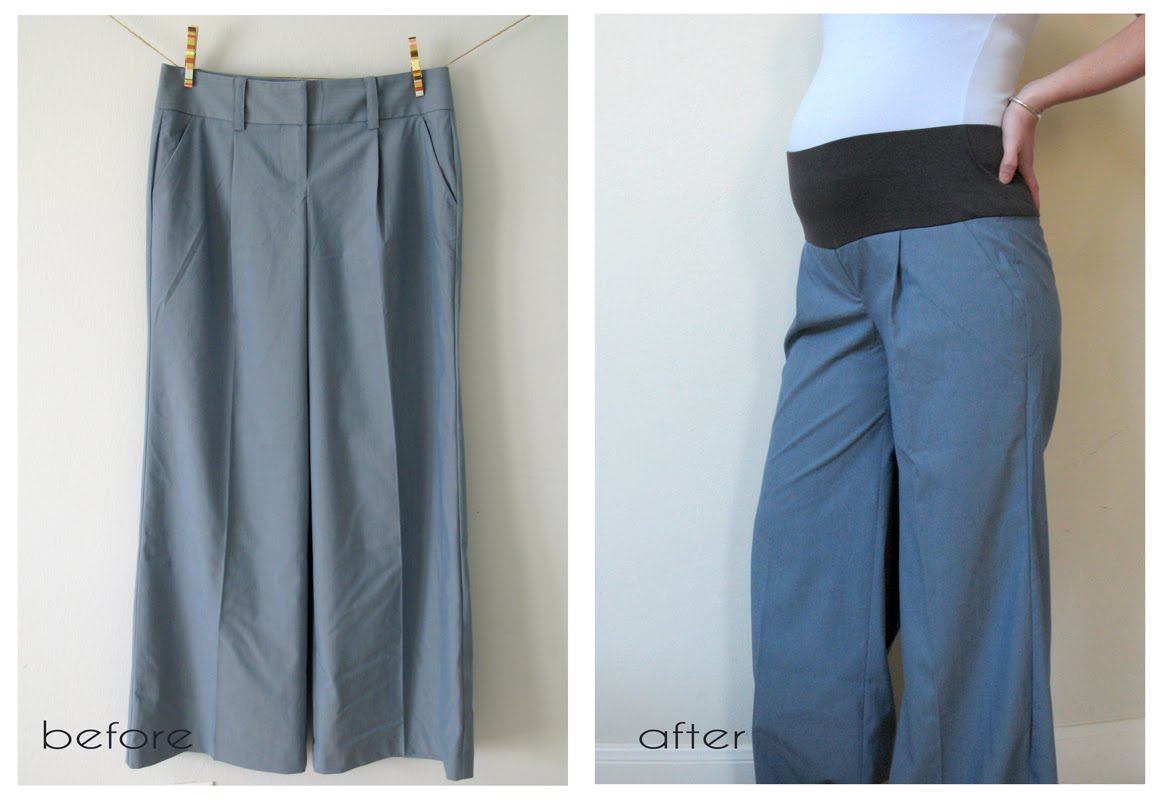 Here I took an $8 pair of clearance trousers and converted them into maternity pants. I've done this in the past with jeans as well... not an extremely difficult alteration but most definitely a PERMANENT one. Keep that in mind before deciding to convert your $200 designer jeans into maternity. There's no going back... they will be maternity FOREVER. Below is my tutorial for converting regular pants into maternity with a demi panel. A demi panel is the stretch panel that sits low or under your belly. Why do I like demi panel? Because for me it's the most comfortable and hip option (as opposed to the traditional granny maternity pants that you hike up to your boobs... like I need another reason to feel ugo while I'm pregnant!).
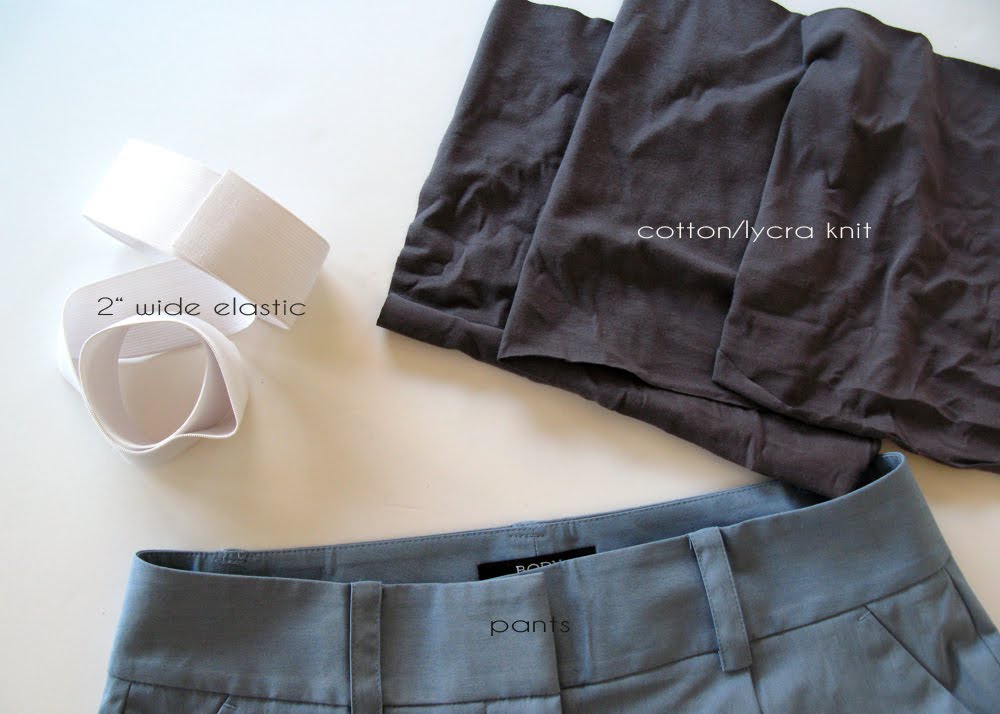


 If you like, you can go one step further and top stitch just above the pant line on the waistband side. I didn't because I'm confident that my serged stitching will hold, but if you used a sewing machine to attach the waistband then I recommend topstitching.


 ♥ Consider this tutorial my early Christmas present to you ♥


 Or if you're comfortable with sewing through that many sandwiched layers all at once, it'll look this this:


 Turn right side out, crisp corners and press. Top stitch along the three sides.


